To
comply with the Skidmore template format, graphics must
be placed in either the side bar or in the main editable
region. Generally, the pictures used in the main region
should be limited to titles and simple design. This
will prevent the viewer from becoming distracted from
the page's content.
Graphics in
the main editable region should be small, but do not
need to fit any specific aspect ratio (the ratio of
width to height). A graphic placed in the side bar,
however, can be no more than 120 pixels wide. To make
sure that your graphic is this size, open a new project
in Photoshop or Fireworks and manually type in the width
and height. Now open the graphic that you want to have
on your Web page, and either copy it or drag it into
the new window. Before saving the image, you must decide
on the quality of the picture you wish to retain...
Graphic compression will determine how good the picture
appears to the viewer. As a Web designer, it is your
goal to minimize the file size without losing any image
quality. The reason for this is that smaller images
will appear in a web browsers much faster than larger
ones. Try saving your pictures several times under different
names, with different quality settings. Remember to
always use JPEG compression (the Compuserve GIF format
is also acceptable).
A good rule is to keep small pictures at less than 100K
and large pictures less than 200K. Never attempt to
use any picture over 1MB; files this size can cause
extended waits for the site visitor. In the series of
pictures below, the same picture was saved three times.
The medium- and high-quality pictures look almost identical,
whereas the low-quality picture is very grainy. In this
case, the medium-quality picture is a good compromise
between quality and file size.

Now that you have selected the desired picture, save
it with a unique name using Photoshop or Fireworks,
and return to Dreamweaver. Click once in the "Optional
Image Here" box and select Insert > Image. Browse
and select the image file, and import it.
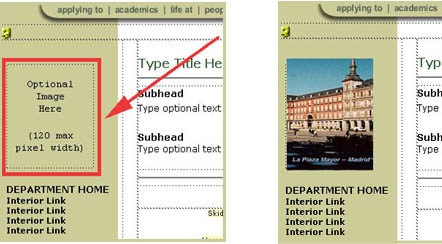 If the image file has been
formated to the correct width (up to 120 pixels), then
it should appear like the image above. If the image
is larger then the cell designated for the image, then
the area beyond 120 pixels will be cropped. The height
of the cell may be adjusted to fit larger images, but
not the width.
If the image file has been
formated to the correct width (up to 120 pixels), then
it should appear like the image above. If the image
is larger then the cell designated for the image, then
the area beyond 120 pixels will be cropped. The height
of the cell may be adjusted to fit larger images, but
not the width.
You may wish to create cells for all of the images used
on your Web page. This is a trick that Web designers
often employ to keep the layout of the page in order,
while writing text and adding other elements.
|