
Overwrite
Uploading a new version of a previously uploaded file
When you have the Overwrite box clicked, your new upload (of the same filename and filetype) will overwrite the old version, and automatically overwrite any links that were made using the OU link feature. Overwriting a document or an image is a fantatic way to upload files. It is considered the best practice for four reasons.
- It updates a file without having to edit a page or group of pages. Because the file path is the same, the only step is to overwrite.
- It's search engine friendly. Search engines like Google scan documents for search results and pick top results based off popularity. A older document might stay at the top of a results page because it has more clicks even thought it's outdated. Overwriting a documents keeps the correct and updated version on top.
- It ensures that old files are no longer able to be found.
- It keeps the /documents/ folder clean.
Generally speaking, the steps are:
- Update the document/image on your computer.
- Save it with the same file name as the one currently uploaded on your website.
- Upload the new version into the same folder, making sure to click the "overwrite" box.
- Publish the new version of the document/image.
Documents (PDF or Word Doc)
- Make the edits on the document on your computer.
- Determine where the current file is located on your site, and what the name of it
is.
- Hover your cursor over the link for the file, and note the URL that pops up on the bottom of your browser screen.
- Rename your new version of the file, on your computer, to the same name as currently
exists on the web server. Capitalization and proper use of dashes and underscores
count - the file name must be exactly the same as the one existing on the web server.
- If your current web site file is a PDF, the replacement file must also be a PDF (or Word doc, or Excel file, etc.)
- Navigate to your /documents/ folder (or whatever folder is appropriate given your desired file location)
- Click "Upload" in the top right area of the screen.
- The Upload popup will load. There are many different aspects to pay attention to:
- Click the box for Overwrite Existing.
- Either click and drag your files from your computer to the Files area, or use the green +Add button to browse for the files.
- Click Start Upload, and your files will be uploaded into your selected folder.
- Find your newly uploaded file in the files list, and publish.
PDF Page Properties
When you open a PDF, you may notice the title in the tab bar. Sometimes, you may find an old date or an incorrect title. This might also show up on a search results page. In order to change that, you'll need to update the page properties
- Save the PDF on your local computer and open it in Adobe Acrobat Pro.
- Go to File > Properties
- Fill out the metadata (see attachment)
- Save
- Upload the new version to OU. Be sure to overwrite the old version. Publish.
The change in Google’s search result will take time so check back another day.

Tab of a PDF

search result page example
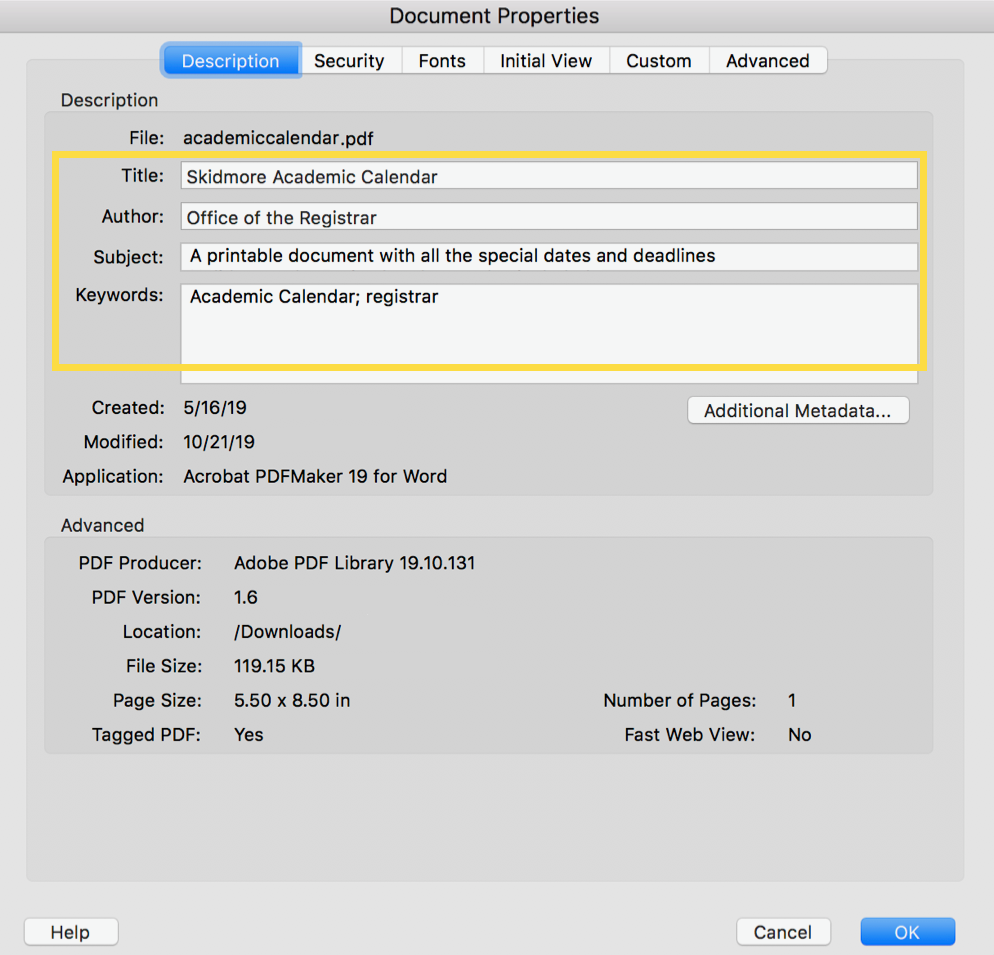
Image Files
Overwriting an existing image works almost exactly the same as with a PDF or other document, except that you are using an image file.
- Make the edits on the image on your computer.
- Determine where the current image is located on your site, and what the name of it
is.
- Right click on the image on your web page, and select Open Image in New Tab.
- In the resulting new tab, notice the URL, and note the location of the image file
- usually the /images/ file of the site.
For most users this will be the pattern - all site images are uploaded into the /images/ folder. However, if a site is particularly large or complex, or some areas of the site are login secured, the folder structure may be different.
- Rename your new version of the image, on your computer, to the same name as currently
exists on the web server. Capitalization and proper use of dashes and underscores
count - the file name must be exactly the same as the one existing on the web server.
- If your current web site file is a jpg, the replacement file must also be a jpg (or gif, etc.)
- Navigate to your /images/ folder (or whatever folder is appropriate given your desired file location)
- When you arrive in the /images/ folder, you will see a list of uploaded files in that directory.
- Click "Upload" in the top right area of the screen.
- The Upload popup will load. There are many different aspects to pay attention to:
- Click the box for Overwrite Existing.
- Either click and drag your files from your computer to the Files area, or use the green +Add button to browse for the files.
- Click Start Upload, and your files will be uploaded into your selected folder.
- Find your newly uploaded file in the files list, and Publish.
When you have the Overwrite box clicked, your new upload (of the same filename and filetype) will overwrite the old version, and automatically overwrite any links that were made using the OU link feature.